
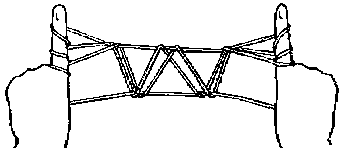
Little Fishes
Pacific
1 IO (Index Opening)
(or OA:re T:F mo-th-pu LN)
2 T mo bnFS pu bfFS
3 T mo tnFS pu tfFS
4 L mo tnFS pu bnFS
5 F ma-gr DS on LN mt-tw up
6 re T
While not very difficult, this figure is the starting point for the next two. Do Index Opening. (Or do Opening A. Release thumbs. Forefingers move over and through the little finger nooses, and pick up the little finger noose, removing it from the little fingers). (2) Thumbs move over the bottom near forefinger string and pick up the bottom far forefinger strings. (3) Thumbs move over the top near forefinger string and pick up the top far forefinger strings. (4) Little fingers move over the top near forefinger strings (that go around the near side of the forefingers) and pick up the bottom near forefinger strings. (5) Forefingers move away from you, grabbing the diagonal string going across the little finger nooses, then move towards you twisting the string up onto the forefingers. (6) Release thumbs.
Although not really a challenging figure, it is the starting point for many that are.
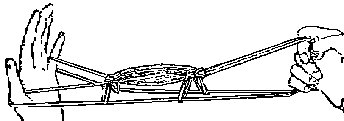
The Porker
(AKA The Dancing Headless Pig) Pacific
1 do Little Fishes
2 T pu #2 & #5 2DS of 6
3 re F:F pu fTS:re T
4 T mu-th LN ma-tw-pu fLS
5 rTF mo-th lFN ht-pt lTN
6 replace N on T
7 do likewise with lLN
8 repeat step 5-7 for rT & rL
9 tr FN to W
10 rTF ht lnLS & lfTS, re lH (all S), replace lL & lT back into lTN &lLN:kl
11 repeat step 10 for rH:kl
12 lL & lT mo-pu rLN & rTN respectively
13 rFMRL mr-th lTN gr 2nTS, re lT:lT pu l2nLS
14 ex slowly, work S to make pig dance
Do Little Fishes. Note that there are six double diagonal strings going over the straight strings from one forefinger to the other. (2) Thumbs move away from you, through the little finger nooses and pick up the 2d and 5th paired diagonal strings. (3) Release forefingers. Forefingers pick up the far thumb strings. Release thumbs. (4) Thumbs move under and through the little finger nooses, then twist out and down picking up the far little finger string as they return to their normal position. (5) Right thumb and forefinger moves over and through the left forefinger noose, then holds on to the far thumb string, removing the noose from the left thumb, pulling it through the left forefinger noose, then (6) putting it back on the left thumb. Do likewise with the left little finger noose, the right thumb noose, and left little finger noose. This puts the forefinger nooses under the palm strings. (9) Transfer the forefinger nooses to the wrists by lifting each noose off with the opposite hand, then inserting the other hand up and through the noose. (10) Right thumb and forefinger holds on to the left near little finger string and left far thumb string, then release left hand from all strings. Put the left thumb and little fingers back into their former nooses held in the right hand, and keep strings loose. (11) Repeat step 10 for right hand, still keeping strings loose. (12) Left little finger and thumb move over, to the right, and pick up their respective right little finger and thumb nooses. (13) Right forefinger, middle, ring and little fingers move right through the left thumb noose and grab the two near thumb strings, removing them from the left thumb. Hold the two left near little finger strings with thumb and forefinger of right hand, release left little finger, then insert left thumb and little fingers into the two nooses held by the right hand as illustrated above. Alternatively (not as shown), leave the two nooses on the left little finger and pick up, or lift up, the two near little finger strings with your left thumb to extend the figure with left fingers pointing away from you. (14) Extend hands apart slowly and the pig will take shape. Work the strings back and forth in various ways to make the headless pig dance.
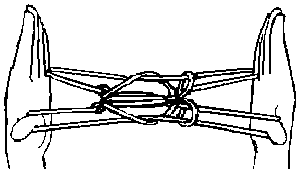
The Frog
Pacific
1 do Little Fishes
2 T pu #1 & #6 2DS of 6
3 do steps 3-14 of The Porker
This figure is a nice variation on The Porker, which you make by doing Little Fishes, and (2) picking up the 1st and 6th diagonal strings instead of the 2d and 5th in step 2 above. (3) Now do steps 3-14 above for a three-dimensional frog, or display it two-dimensionally, as illustrated, to show what it looked like after the truck ran over it.
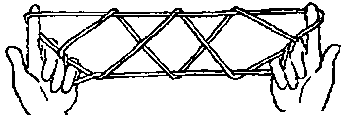
Three Sunfish
Pacific
1 OA:re rF:lF gr lPS th FN:re lT & lL
2 lT & lL pu lFN (P1):lF gr-mt-pu rPS
3 rF mo-th rTN mo-th rLN pu-pt rnLS
4 lL gr fFS:rL mu-th FN gr-de cfTS
5 re T: ex F up for 3-Diamond Catch shown above
6 T mo DS on FN, mu-pu DS on LN
7 LR mt-up-th TN, L pu cSS
8 re F:ex for 3 More Diamonds
9 F mo-th-gr DS on TN:F md-pu fTS pt FN:re T
10 T pu FN:F md-th triangles on LN gr tS of N on TLN pu PS pt FN
11 re T, kl:rT pu rFN:ex, ls rH and Three Sunfish swim away
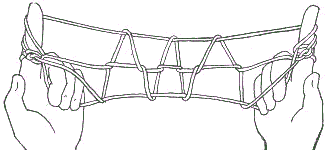
Do Opening A. Release right forefinger. Left forefinger grabs left palm string through the forefinger noose. Release left thumb and little finger. (2) Left thumb and left little finger picks up left forefinger noose (this is Position 1 on the left hand). Left forefinger grabs, moves towards you, then picks up the right palm string. (3) Right forefinger moves over and through the right thumb noose, moves over and through the right little finger noose, picks up and pulls through the right near little finger string. (4) Left little finger grabs the far forefinger string. Right little finger moves under and through the forefinger noose, grabs and depresses the center far thumb string. (5) Release thumbs. Extend forefingers up for the 3-Diamond Catch illustrated above. Aside from being geometrically pleasing, you can ask someone to put their hand through the center diamond, then ask them if they want you to catch their hand or make the string pass magically through it. Release left hand and right little finger, then pull with the right forefinger to catch their hand, or release right hand and left little finger, then pull with the left forefinger to make it go through their hand. Kids will never tire of having you do this. If someone thinks the secret is that when you pull with the right hand you will always catch their hand, do Opening B and reverse all references to right and left above to confound their theory. But where are the sunfish? The figure continues: (6) Thumbs move over the diagonal strings that go around the forefinger nooses, then move under and pick up the diagonal strings on the little finger nooses. (7) Little fingers move towards you, up, then through the thumb nooses picking up, with help from the ring fingers, the straight strings going across the center of the figure. (8) Release the forefingers. Extend to see 3 More Diamonds that might be sunfish. But wait! (9) Forefingers move over, through, and grab the diagonal string that goes around the thumb noose pulling it in close to the palms. Forefingers then move down and pick up the far thumb strings and pull them through the forefinger nooses. Release thumbs. (10) Thumbs pick up the forefinger nooses. Forefingers move down and through the triangles that go around the little finger nooses and grab the top string of the noose that goes around the thumb/little finger noose pulling it close to the palms. Forefingers then pick up the palm strings pulling them through the forefinger nooses, which slip off. (11) Release thumbs, and keep strings loose. Right thumb picks up the right forefinger noose. Extend hands slowly apart, letting the strings on the right hand slip to see the sunfish swim away, getting smaller as they go. This is an interesting figure as it is both symmetrical and asymmetrical in its movements, and produces two geometrical figures, one a catch, plus a final animated figure.
Storm Clouds
Navaho
1 IO (Index Opening)
2 rT mo rbnFS pu rbfFS
3 lF mu ltnFS pu ltfFS
4 rMRL pu rtfFS:lMRL pu lbfFS:RL gr-pt-de tnFS
5 M mt-mo-gr bnFS pu tnFS, re RL:RL gr nMS:re T
for One Cloud (adding temporary tw on F may help)
6 T pu bDS gr-de tDS:re MRL:MRL mt-th-gr TN (re T)
7 M pu 2DCS mu tfFS gr-pt-de tfFS pu FS to RLS, re RL:RL gr nMS:re T
8 T pu SS above DS, CS (bnFS--hunt for it):F pu nTS:re T for two storm clouds
9 T pu bDS gr-de CS:re MRL:MRL mt-th-gr TN (re T)
10 M pu DS+CS mu tfFS gr-pt-de tfFS pu FS to RLS, re RL:RL gr nMS:re T
11 T pu SS above DS, CS:tr to F as in step 8 for three storm clouds
12 repeat step 6 and 7:re tFS:do step 8 for four storm clouds (arrange with T)
13 repeat step 9 and 10:re tFS:do step 11 for five storm clouds (arr.)
14 repeat step 12 for six storm clouds (arr.)
15 repeat step 13 for seven storm clouds (arr.)
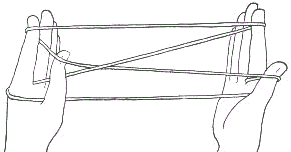
Do the Index Opening. (2) With your right thumb move over the right, bottom, near forefinger string and pick up the right, bottom, far forefinger string. (3) With your left forefinger move under the left, top, near forefinger string and pick up the left, top, far forefinger string.
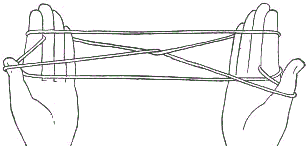
(4) With your right middle, ring, and little fingers pick up the right, top, far forefinger string. With your left middle, ring, and little fingers pick up the left, bottom, far forefinger string.
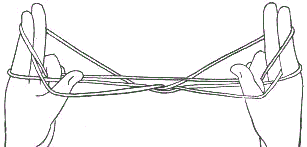
The ring and little fingers of each hand then grab the top, near forefinger string, pulling it down and behind the bottom, near forefinger strings.
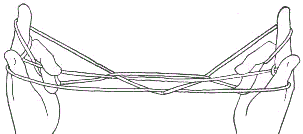
(5) Middle fingers move towards you and grab the bottom near forefinger string, then pull it away from you over the top near forefinger string, so that....
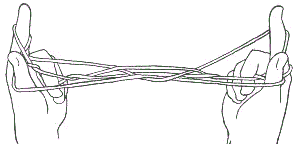
...the middle fingers can pick up the top near forefinger strings. Release the ring and little fingers, then with the ring and little fingers grab the near middle finger strings and release the thumbs to form...
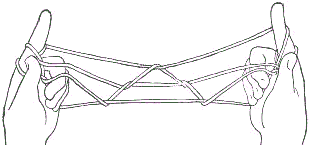
...the first storm cloud. If you are using a long #12 string, which you will if you want to form four or more clouds, this first cloud won't turn out well, so instead of releasing your thumbs, merely loosen the thumb strings to display the first cloud, then release the thumbs and continue. Or you can temporarily put another twist onto the forefingers to make it come out.
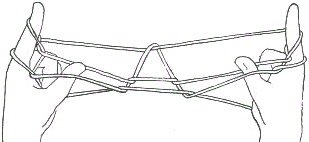
(6) Thumbs pick up the bottom (lower) diagonal strings, the grab and depress the top (upper) diagonal strings.
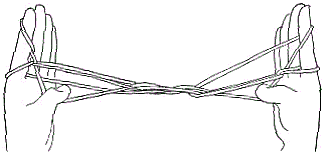
Release the middle, ring, and little fingers, then...
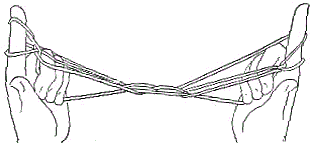
...with the middle, ring, and little fingers move towards you, under and through, and grab the thumb nooses, releasing the thumbs as you do.
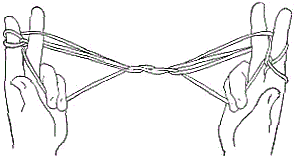
(7) Middle fingers pick up the two diagonal center strings, then moves under the top, far forefinger strings and grabs them,...
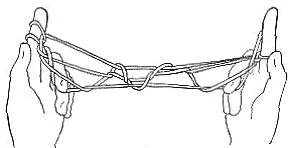
...pulling them down and picking up the string going from the forefingers to the ring/little fingers. Release the ring and little fingers as shown, then...
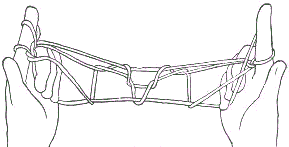
....put the ring and little fingers into the middle finger loop.
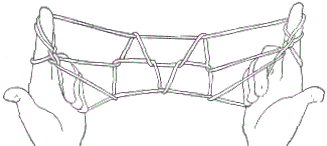
(8) Thumbs now pick up the string above the lower diagonal and the center string that goes straight across from forefinger to forefinger. This string is a continuation of the bottom near forefinger strings and may be hard to find. Hunt for it with your thumbs, then, when you find it, lift up on it and pick up the near thumb string with your forefingers, releasing the thumbs, and so transferring the string to the forefingers to form two storm clouds.
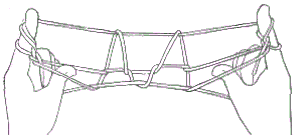
(9) In a manner similar to step 6, the thumbs pick up the bottom diagonal strings, then grab and depress the center strings. Release the middle, ring, and little fingers, then with these fingers move towards you and grab the thumb nooses, releasing the thumbs as you do so.
(10) Much the same as you did in step 7, use your middle fingers to pick up the diagonal and center strings, then move away from you, under the top far forefinger strings and grab them, pulling them down and picking up the string going from the forefingers to the ring/little fingers. Release the ring and little fingers, then put the ring and little fingers into the middle finger loop.

(11) Continuing as in step 8, thumbs now pick up the string (above the lower diagonal and the center string) that goes straight across from forefinger to forefinger. This string is a continuation of the bottom near forefinger strings and may be hard to find. Hunt for it with your thumbs, then, when you find it, lift up on it and then transfer it to the forefingers to form three storm clouds.
(12) Repeat step 6 and 7, then release the top twist of string on the forefingers and do step 8 to make four storm clouds. You may need to use your thumbs to arrange the center clouds to make them larger, so all are of similar size.
(13) Repeat step 9 and 10, then release the top forefinger string. Do step 11 to make five storm clouds. Again, arrange figure.
(14) Repeat step 12 to make six storm clouds, and arrange. You may find you need an extra long string. (15) Repeat step 13 for seven storm clouds....

This figure resembles the pictographs used to represent storm clouds. The same symbol is also used in Navaho blankets.
![]()
- Visit our Zazzle store:
Fine poetry and art go together. Support this site: Visit our Zazzle store featuring ultra hi-res images of artworks, Hubble/ESA/NASA space images, Mandelbrot fractals, maps and more. Images up to 525 megapixels allow for fine printing at the largest sizes. Give a fine print as a gift that could hang around for a hundred years or more.
Other sites by Alysion
Popular Sites:- Fun with Dimensional Analysis
- Medication Math for the Nursing Student
- WWW Collection of Favorite String Figures
- Poems to Memorize & Memorable Poems
- Alternative Handwriting & Shorthand Systems
- Handywrite
- Small Animal Euthanasia
- Ryan's Favorite Kid Poems
- World's Funniest Jokes
Mindfulness Sites:
- For wisdom follow: The Path of the Dog
- Are You a Doggiesattva?
- The Five Precepts of Buddhism
- The Diamond Sutra: Condensed version
- The Platform Sutra of Huineng: Condensed
- The Tibetan Book of the Great Liberation
- Ch'an Teachings of Huang Po on One Mind
- Zen and the Art of Mindful Bus Riding
- Beginnings: First Lines from Scriptures
- Two Zen Stories
- 14 Mindfulness Trainings of Thich Nhat Hanh
- 14 Thoughtfulness Trainings
- Westfulness and Eastfulness
- World Religion Simplified
- Mindfulness Meditation Bell, Gong, Timer
Thrival Sites:
- Buyer's Guide to Food Preparedness Products
- Sustainability Issues: From vision to practice
- Survival Retreat? Maybe now is the time
- Battling Bermudagrass
- Human Chow: Cheap Food
- Private Retreat: Alysion Acres
Sustainability Issues:
- Earth at Night: Do you live in the glow?
- Environment, Power, and Society
- The Prosperous Way Up and Down
- Circles of Non-belief: The Federation alternative
- Envision Tucson Sustainable
- Community Urban Micro Farms
- Alternative Farming
- Washing Machine Magic
- Eco-nomy 101: Why you can't do just one thing
- Confessions of a Generalist
- The Post-Car Culture
- Rainwater Catchment: How to harvest scarcity
- Stop Pumping Ground Water
- From Horses to E-cycles: A brief history
- Sustainable Tucson: Hows to sustain
- Ethics of the Borg Collective
- Alternative to the Federation
- Cruise Ship Earth: Enjoy the cruise
- Expecting the Expected: Disaster happens
- Understanding the Exponenital Function
- A Tale of Two Islands
- Island Ethics: Earth Island as metaphor
- The Book: From beyond the Federation
- The Ascent of Life: Chapter 1
- Apocalypse Past: Chapter 2
- The Reconstruction Era: Chapter 3
- The Particulars of Human Life: Chapter 4
- Ascent of the Inquiring Ones: Chapter 5
Satirical Sites:
- Take the Super Post-Mensa IQ Test
- Infidel Guides: Islam, Theism, Atheism, ...
- World Religions Simplified
- The True Right to Life Movement
Literature/Poetry Sites:
- Mom's Favorite Poems
- Lorien: A Poem
- Ryan's Favorite Kid Poems
- Tucson Literati Discussion Group
- Walled-in: A Poem
- Poems to Memorize & Memorable Poems
Interesting Sites:
- Sun Tour America by Solar E-bike
- Sustainable Technology to Enable
- Grammys Urban Micro Farm
- Solar Slow Cooker Design
- Celebrate Inquiry
- Pastaology 101
- Flying Spaghetti Monster Camp
- The Book: An Infidel's Biblia
- Global Warming 123 (bing-bang-boom)
- How to Use OpenSeaDragon
- Battling Bermuda Grass
- San Pedro Valley Community Cultural Center
- One Homestead: An intentional community
- Making Tree of Life: Fun with phylogenetics
- Making Boxes for Rock & Mineral Collection
- Making a Mass Balance Scale
- Ryan's 50 States Flashcards
- Adventures of MeraLee
- eBike Touring Association
- Cochise Stronghold Trail
External Links
- International String Figure Association
- Learn about string figuring.
- Strings on Your Fingers
- Bibliography, Links, Resources.
- String Figures
- The Wikipedia article.
- Arctic String Figure Project
- Lots of figures here with great illustrations.
- String Figures, Mathematics, Origin
- Some original figures.
- String Figures by Brian Cox
- The Incredible String Man.
Top 10 Poems from Alysion's
Bucket List of Poems
to Read Before You Die
- 1. The Rainy Day by Henry W. Longfellow
- 2. Fire and Ice by Robert Frost
- 3. A Dream within a Dream by Edgar Allan Poe
- 4. The Purple Cow by Gelett Burgess
- 5. If by Rudyard Kipling
- 6. To See a World by William Blake
- 7. Ten Little Limericks
- 8. First Fig by Edna St. Vincent Millay
- 9. Alone by Edgar Allan Poe
- 10. I'm nobody! Who are you? Emily Dickinson

